Getting Started
| What is UpviseJS? Prerequisites My First App : Hello World | Second App: Multiple Pages Third App: Asking user input Fourth app : Complete Database App |
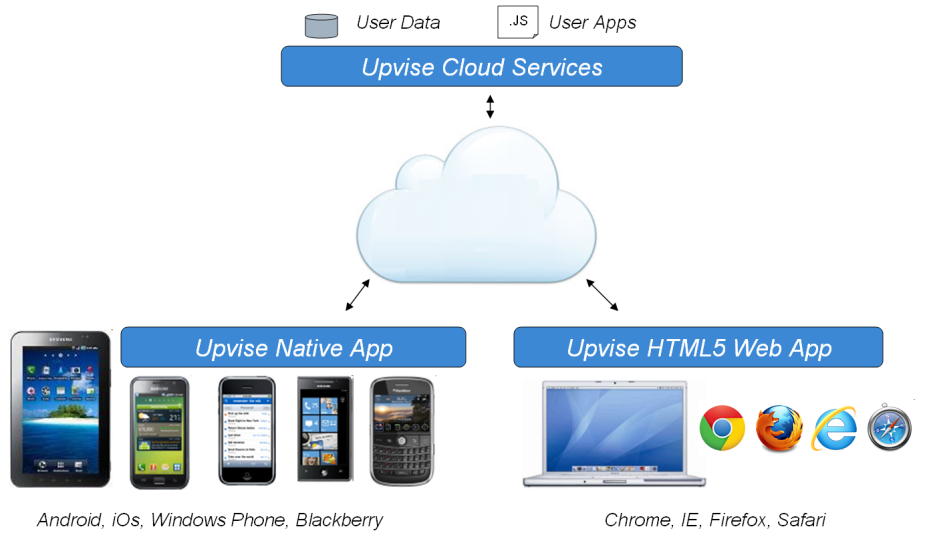
What is UpviseJS?
UpviseJS is a framework to create mobile+web cloud applications using Javascript code.
- Upvise native mobile App (for Android, iOS & Windows Phone). It runs natively your application on phones & tablets
- Upvise HTML5 Web App (for Chrome, Firefox, IE, Safari). It runs your application on a web browser
- Upvise Cloud IDE, a web based Integrated Development Environment. Create, test, debug & deploy your application.
- Upvise Cloud Services provides back-end services for data storage, synchronization, authentication, application deployment & notifications.
Prerequisites
- Create an Upvise Account on your web browser
- Install the Upvise native app for Android. On your phone / Tablet : Start Google Play, search for Upvise Pro and install it
- Start Upvise on your phone and sign in
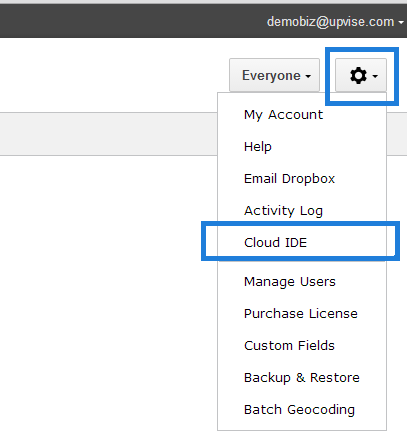
- Sign In to your Upvise Web Account on your computer
- Click on the Settings icon (top right) and click on Cloud IDE menu item
My First App : Hello World
You're ready to start coding your first UpviseJS app. Copy and paste the following code in the IDE Source Code tab.
Config.appid= "myapp";
Config.version = "1";
Config.title = "My App";

function main() {
    List.addItem("Hello World");
    List.show();
}
Run & Debug
To run this sample, Click on the Run button in the editor window. this will start the UpviseJS Emulator. You can change the target type using the top black bar in the Emulator window and choose between phone, tablet and web.
To debug your application.
- Click on the menu icon in Chrome (top right on the screen) then click Tools > Developper Tools (or Ctrl+Shift+I). This will open the Chrome developer frame at the bottom of the browser window.
- Click on Source tab and then on the item DEBUG domain, then on debugapp.js. This will display the source code of your app
- Click on any line number to add or remove a breakpoint
Deploy to Phone / Tablet
Once you validated your application runs fine in the Emulator, click on the Deploy button. This will deploy it to your Upvise account. At this point the app is available on any device in your account.
- Go to your Android phone or Tablet, make sure you're signed in and refresh the screen.
- Tap on the top left icon in the toolbar, to reveal the application list side view. You will find your Application "Test" here.
- Tap on "Test" application to run it.
- On your web account, click no the top left icon on theblue toolbar and click on "Test" app.
Second App: Multiple Pages
Let's now create a second page on our app and add a link to go from the home page to the second page and a button to go back. Create a second function called page2() and implement it with the same simple calls to List.addXXX() method and a final call to List.show().
To link from the home page, we just use the List.addItem(label, onclick) method onclick containing the function call to page2().
Config.appid= "myapp";
Config.version = "2";

function main() {
    Toolbar.setTitle("This is Page 1");
    List.addItem("Goto Page 2", "page2()");
    List.show();
}

function page2() {
    Toolbar.setTitle("This is Page 2");
    List.addItem("Go Back", "History.back()");
    List.show();
}
Third App: Asking user input
Let's add some user input, pass the parameters to a new page and display the results. Let's calculate the Body Mass Index or BMI, using the formula mass (kg) / (height (m))2 The List class provides the method List.addTextBox(id, label, value, onchange, style) to ask for text user input.
Config.appid= "myapp";
Config.version = "3";
Config.title = "Body Mass Index";

function main() {
    Toolbar.setTitle("Body Mass Index");
    List.addTextBox("weight", "Enter your weight (kg)", "70", null, "numeric");
    List.addTextBox("height", "Enter your height (cm)","180" , null, "numeric");
    List.addButton("Compute", "onButton()");
    List.show();
}

function onButton() {
    // get Values and validate them
    var weight = List.getValue("weight");
    var height = List.getValue("height");
    if (weight == null) {App.alert("Please enter your height"); return};
    if (height == null) {App.alert("Please enter your weight"); return};

    weight = parseInt(weight);
    height = parseInt(height);
    // Redirect to the result page
    History.redirect("viewResult({weight},{height})");
}

function viewResult(weight, height) {
    var bmi = weight*10000 / Math.pow(height, 2);
    bmi = Math.round1(bmi); // Math.round1 is an UpviseJS addition tot he Javascript Math Object

    List.addItemTitle("Body Mass Index", bmi);
    List.addButton("Back", "History.back()");
    List.show();
}
Fourth App: Database
Let's create a complete small application to manage leads.
Source code Sample on Github.Step 1. First we need to define the data structure to hold our data. We create one table called leads, with the following columns name : id (mandatory string primary key), name, email, phone. and date of type DATE. When the type of the column is omitted it is string by default. We use the Config.tables property array to define the table.
Config.appid= "myapp";
Config.version = "4";
Config.tables["leads"] = "id;name;email;phone;source;date DATE";
Step 2: Let's now create the home page of your app
It simply lists all leads and contains a + button to create a new one.
function main() {
    Toolbar.setTitle("Leads");
    Toolbar.addButton("New Lead", "newLead()", "new");
    var leads = Query.select("leads", "id;name", null, "date DESC");
    for (var i = 0; i < leads.length; i++) {
        var lead = leads[i];
        List.addItem(lead.name, "viewLead({lead.id})");
    }
    List.show();
}
Step 3: We now need to create the viewLead() screen.
We simply use the
Query.selectId() method which returns the lead identified by its id primary key.
We also use standard List.addItemLabel() calls to display the phone, email and source.
We finally add a button in the toolbar to edit the lead.
function viewLead(id) {
    var lead = Query.selectId("leads", id);
    if (lead == null) {History.back(); return;}
    Toolbar.setTitle("Lead Info");
    Toolbar.addButton("Edit", "editLead({id})");
    List.addItemTitle(lead.name);
    List.addItemLabel("Phone", Format.phone(lead.phone), "App.call({lead.phone})");
    List.addItemLabel("Email", lead.email, "App.mailto({lead.email})");
    List.addItemLabel("Source", source);
    List.show();
}
Step 4: Let's create now the Edit screen for the Lead
Each field is displayed with a call to List.addTextBox(id, label, value, onchange, type) call.
The generic onchange function call will be called by the framework when the data is modified.
the this.id and this.value keywords contains the id and value of the current edited item, similar to javascript event callback in a browser.
In our case the id value of each field is simply the column name.
function editLead(leadid) {
    var lead = Query.selectId("leads", leadid);
    Toolbar.setTitle("Edit Lead");
    Toolbar.setStyle("edit");
    Toolbar.addButton("Delete", "deleteLead({leadid})", "delete");

    var onchange = "Query.updateId('leads',{leadid},this.id,this.value)";
    List.addTextBox("name", "Lead Name", lead.name, onchange, "text");
    List.addTextBox("phone", "Phone number", lead.phone, onchange, "text");
    List.addTextBox("email", "Email", lead.email, onchange, "text");
    List.show();
}
Step 5: Let's implement the newLead() and deleteLead() function
To create a new lead, we insert a new blank record and redirect to the editLead() screen.
Instead of calling directly the editLead() function we indicate to the framework to redirect or replace the current state with
History.redirect()
function newLead() {
    var values = {date:Date.now();};
    var id = Query.insert("leads", values);
    History.redirect("editLead({id})");
}

function deleteLead(id) {
    Query.deleteId("leads", id);
    History.back();
}